중보급기 G2에 비해 보급기 X2는 frequency 설정이 난감하고(전압 조정하라는데 ㅠㅠ) 설정할 수 있는 게 거의 없고, 루미너스 intensity 기능도 지원하지 않고, 명령어를 넣어 설정하는 방식을 지원하지 않아서 단조로운 스캐닝만 할 수 있다. 스캐닝 실력은 그럭저럭 무난해 보인다. 중고로 3만5천원에 업어온 X2와, 중고로 9만원에 업어온 G2의 차이랄까...ㅋㅋ
일단 세팅을 위한 명령어를 제공하지 않는데, 포트를 열고 데이터를 읽어오면 그때부터 지가 열심히 달린다. 데이터도 어디 중간부터 보내주기 때문에 패킷 시작 포인트를 찾아서 데이터를 확인하면 된다. 좀 단순하고, G2에 비해 오히려 편하긴 한데, 무언가 좀 허전한 느낌이다. G2와 데이터 포맷에서 다른 점은 G2가 한 점의 distance + intensity에 3바이트를 할당했다면, X2는 distance 정보에 2바이트를 할당했기 때문에 distance 정보 다루기는 살짝 더 편하다.
import serial
import time

s = serial.Serial('/dev/ttyUSB0', 115200)
time.sleep(3)
read_data = s.read(1001)
print("len_read_data: ", len(read_data))

with open("file", "wb") as fs:
  fs.write(read_data)

s.close()
이 스크립트를 실행하면 'file'이라는 이진파일이 생기는데, 이 녀석을 hexedit로 들여다 보면 대충 이렀다.
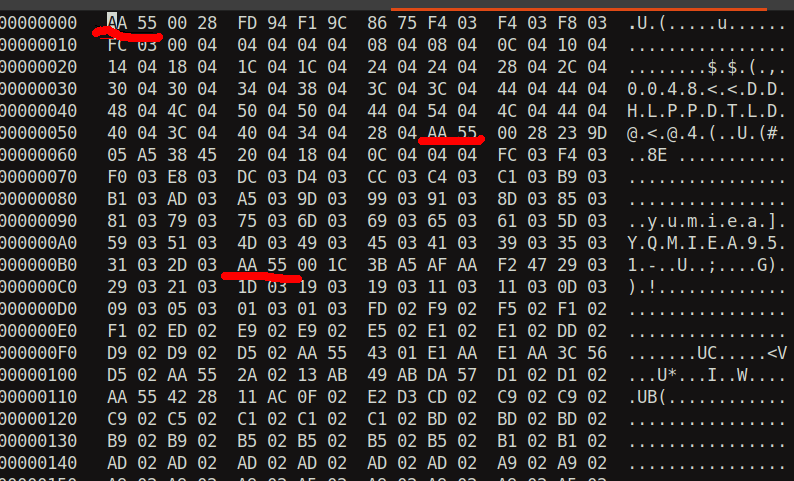
패킷 헤더(PH)인 AA 55가 적당한 간격을 두고 나온다. 간격이 일정하지는 않다. 앞서 몇 번 테스트했을 때는 AA 55가 첫머리에 나오지 않고 좀 뒤에 출현하기도 했다. AA 55를 찾아서 그 뒤의 정보들을 쭉 해석해서 처리하면 된다. 아마 X4랑 비슷할 것 같은데, G2는 약간 다른 부분이 있다. 아까 말한, X2의 거리 정보(2바이트) vs G2의 거리+intensity정보(3바이트)의 차이를 빼면, 실제 코딩에서는 거의 같을 것이다. 그래서 G2의 코드를 살짝만 수정했다. 3*j+1을 2*j로, 3*j+2를 2*j+1로... 즉 3의 배수로 데이터를 처리하는 G2와, 2의 배수로 정보를 처리하는 X2의 차이에 불과하다. 처음엔, 명령어 세팅도 되지 않고, 라이다의 스캐닝 회전과 스탠바이 회전을 오가는 것을 제어할 방법이 없다 보니, scan 명령 내리기도 불가능하고 stop을 명령하기도 안 되고, 첫 반응 데이터가 규격대로 들어오지 않으면 나중의 패킷 데이터를 어떻게 처리할 수 있으려나 걱정했는데, 그냥 막 패킷을 잡아서 분석하는 용도인 것 같다. 세련된 작업이 필요하다면 상위 버전을 구하면 될 것 같고, 간단한 라이다 기능은 X2로도 괜찮을 것 같다. 이어서 소스코드를 올리겠다.
먼저 check code, 즉 무결점 조사를 하는 코드를 간단히 작성했다. G2의 것을 살짝 수정만 한 것이다.
# YDLidar X2용
# 데이터 무결점 유무를 체크하는 코드
# 각 필드를 XOR 연산하여 cs 값과 비교함

import serial
import re
import math

s = serial.Serial('/dev/ttyUSB0', 115200)


MIN_LENGTH = 12 # 한 패킷의 최소 길이. 패킷 길이가 이 이하이면 이 패킷은 건너뛰는 걸로...
cloud_header = 10  # 클라우드 데이터 헤드 bytes
point_size = 2  # 점 하나 거리 정보 bytes (G2는 3바이트)

while True:
  read_data = s.read(512)

  indexes = [m.start() for m in re.finditer(b"\xaa\x55", read_data)]
  count = len(indexes)
  len_read = len(read_data)
  print("indexes: ", indexes)
  print("len(indexes)", count)
  print("len_read: ", len_read)

  for i in range(count):
    print("----------")
    if i == count - 1: # 마지막 패킷이라면, end 인덱스가 없으므로 끝지점을 직접 지정
      data = read_data[indexes[i] : len_read]
      #print("last packet length : ", len(data))
    else :
      data = read_data[indexes[i] : indexes[i+1]] # header부터 다음 header 직전까지 읽음
    len_data = len(data)
    print("len_data: ", len_data)

    if len_data <= MIN_LENGTH:
      continue

    lsn = data[3] # sample quantity
    print("lsn(sample quantity): ", lsn)

    if lsn != 1: # 한 패킷 안의 샘플링 데이터 갯수. 없으면 lsn=1
      # 앵글 계산 end_angle , start_angle
      fsa1 = data[4]  # LSB : start angle
      fsa2 = data[5]  # MSB : start angle
      lsa1 = data[6]  # LSB : end angle
      lsa2 = data[7]  # MSB : end angle

      #--------------------------------
      #  check code로 데이터 무결성 검토
      #  cs_xor_sequence 함수로 뺄 듯? : X2 Deveopment Manual <FIG 6 XOR SEQUENCE> 참조
      #--------------------------------
      # cs (check code) 구하기
      cs = data[8] | (data[9] << 8)
      ph = data[0] | (data[1] << 8)  # Packet header, 0x55AA로 고정
      print("ph = ", hex(ph))
      # XOR 연산 시작
      tmp_cs = ph ^ (data[2] | (data[3] << 8))  # (1) ct(f&c) 와 lsn
      tmp_cs = tmp_cs ^ (fsa1 | (fsa2 << 8)) # (2)
      tmp_cs = tmp_cs ^ (lsa1 | (lsa2 << 8)) # (3)
      # 거리 정보와 XOR 연산
      for n in range(0, lsn):
        if 10+2*n+1 >= len_data: # 아래에서 발생할 수 있는 인덱싱 에러 방지. 인덱스가 데이터 길이를 벗어나지 않도록 체크
          print("인덱싱 범위 벗어남")
          break
        tmp_cs ^= (data[10+2*n] | data[10+2*n+1] << 8) # (4)

      print("check code = ", hex(cs))
      print("tmp_cs = ", hex(tmp_cs))
      if cs == tmp_cs:
        print("데이터에 결함이 없습니다.")
      else:
        print("데이터에 결함이 있습니다.")

      for j in range(0, lsn):
        if 10+2*j+1 >= len_data: # 아래에서 발생할 수 있는 인덱싱 에러 방지. 인덱스가 데이터 길이를 벗어나지 않도록 체크
          break

        # 거리 계산
        distance = int((data[10+2*j] | (data[10+2*j+1] << 8)) / 4)
        print("distance: ", distance)  # 단위 mm
  #exit()

s.close()
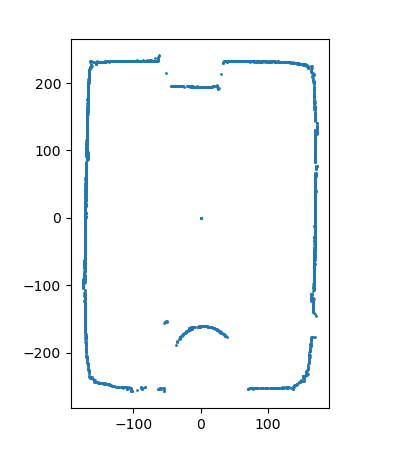
다음에는, 스캔해서 plot하는 코드다. 상자 안에 넣어, 약간의 소품을 넣고 테스트를 해보니, 대략 1.5만 바이트 처리 전후로 결과가 좋아지기 시작한다. 마치 딥러닝처럼, 훈련을 너무 적게 하면 이상하게 점이 찍히고, 많이 반복하면 점점 그림이 좋아지는 격이다.
#  YDLidar X2 용

import serial
import re
import math
from matplotlib import pyplot as plt


# 맨처음으로, start_angle과 end_angle을 구한다. 이 둘을 구하는 공식은 같다.
def first_level_angle(lsb, msb):
  return ((lsb | (msb << 8)) >> 1) / 64.0

# end_angle 과 start_angle의 차이를 구한다.
# end_angle 이 360도를 넘어가서 1부터 시작하면 360을 더해서, 거기서 start_angle을 빼서 차이를 구한다.
def diff_angle(end_angle, start_angle):
  if end_angle < start_angle: # end_angle이 360도를 넘어 1도로 되돌아간 상황
    end_angle += 360
  return end_angle - start_angle

# start_angle 과 end_angle 사이의 angle들을 구한다.
# diff_angle 을 lsn-1로 나누면 하나의 간격(약 0.5도) angle이 나온다. 이 angle*idx를 start_angle에 더한다.
# 360도를 넘어가면 360을 뺀다.
def inter_angle(idx, diff_angle, lsn, start_angle):
  ret = (diff_angle / (lsn - 1)) * (idx - 1) + start_angle
  if ret >= 360:
    ret -= 360
  return ret

# 개발자 가이드 나온대로 따라한 수정 앵글 value
def angle_correct(angle, distance):
  if distance == 0:
    return 0.0
  #return angle + (math.atan(21.8 * ((155.3 - distance)/(155.3*distance))) * 180/math.pi) # OK
  #return angle + (math.atan2(21.8 * (155.3 - distance), 155.3 * distance) * 180/math.pi) # OK
  return angle + math.degrees(math.atan2(21.8 * (155.3 - distance), 155.3 * distance))
  # 거리와 각도로부터 점의 좌표 구해서 math.atan2에 집어넣기 : 각도를 degree단위로 바꿀 필요성
  # math.degrees(): degree로 변환, math.radians(): 라디안으로 변환

def scan_values(data_size):
  read_data = s.read(data_size)

  indexes = [m.start() for m in re.finditer(b"\xaa\x55", read_data)]
  count = len(indexes)
  len_read = len(read_data)
  print("indexes: ", indexes)
  print("len(indexes)", count)
  print("len_read: ", len_read)

  lx = []
  ly = []
  for i in range(count):
    #print("-------")
    if i == count - 1: # 마지막 패킷이라면, end 인덱스가 없으므로 끝지점을 직접 지정
      data = read_data[indexes[i] : len_read]
      #print("last packet length : ", len(data))
    else :
      data = read_data[indexes[i] : indexes[i+1]] # header부터 다음 header 직전까지 읽음
    len_data = len(data)
    #print("len_data: ", len_data)

    if len_data <= MIN_LENGTH:
      continue

    lsn = data[3] # sample quantity
    print("lsn(sample quantity): ", lsn)

    if lsn != 1: # 한 패킷 안의 샘플링 데이터 갯수. 없으면 lsn=1
      # 앵글 계산 end_angle , start_angle
      fsa1 = data[4]  # LSB : start angle
      fsa2 = data[5]  # MSB : start angle
      lsa1 = data[6]  # LSB : end angle
      lsa2 = data[7]  # MSB : end angle

      start_angle = first_level_angle(fsa1, fsa2)
      end_angle =   first_level_angle(lsa1, lsa2)
      diff_angle_ = diff_angle(end_angle, start_angle)
      print("start_angle: ", start_angle)
      print("end_angle: ", end_angle)
      print("diff_angle: ", diff_angle_)
      print("step angle: ", diff_angle_/(lsn-1))

      for j in range(0, lsn):
        if 10+2*j+1 >= len_data: # 아래에서 발생할 수 있는 인덱싱 에러 방지. 인덱스가 데이터 길이를 벗어나지 않도록 체크
          break

        # -------- 거리 계산
        distance = int((data[10+2*j] | (data[10+2*j+1] << 8)) / 4)
        print("distance: ", distance)  # 단위 mm

        # Intermediate angle solution formula (중간 각도 구하기). 코멘트는 메뉴얼에 나온 공식대로. 메뉴얼 설명이 부실함.
        if j > 0 and j < lsn-1:  # start_angle 과 end_angle 가급적 건드리지 않기
          inter_angle_ = inter_angle(j, diff_angle_, lsn, start_angle)
        elif j == 0:
          inter_angle_ = start_angle
        elif j == lsn - 1:
          inter_angle_ = end_angle
        angle_correct_ = angle_correct(inter_angle_, distance)

        # 좌표 구하기 pos_x, pos_y
        pos_x = distance * math.cos(math.radians(angle_correct_))
        #pos_x = distance * math.cos(inter_angle_*(math.pi/180))
        # 어떤 이유에선지는 모르겠지만 y좌표값이 상하반전, 그러니까 +, -가 뒤바뀌어 나타남. (-1)을 곱해서 상하반전(vertical flip)을 안해도 되도록...
        pos_y =  (-1) * distance * math.sin(math.radians(angle_correct_))
        print(f"(x, y) : ({pos_x}, {pos_y})")
        # 리스트에 추가하기
        lx.append(pos_x)
        ly.append(pos_y)
  return lx, ly

def plot_data(x, y):
  plt.cla()
  plt.ylim(-4000, 4000)
  plt.xlim(-4000, 4000)
  plt.scatter(x, y, s=1**2)
  # plt.axis('square')
  plt.axis('scaled')
  plt.show()

s = serial.Serial('/dev/ttyUSB0', 115200)

MIN_LENGTH = 12 # 한 패킷의 최소 길이. 헤더 정보 10바이트와 거리 정보 2바이트(lsn=1)이면 빈 데이터라는 뜻이므로 건너뛴다.
#cloud_header = 10  # 클라우드 데이터 헤드 bytes
#point_size = 2  # 거리 데이터 bytes

for i in range(2):
  lx_, ly_ = scan_values(6000)

plot_data(lx_, ly_)

s.close()